Happy Time to all Apple Family :)
Today we will learn how to Get Current Location in iPhone using GPS.
So stay with me, and do it step by step by .. don't forget to drop me a message or comment.
Note : This Application Developed Using : iOS 6
PHASE - I (Create New Project)
So, Let's Fire Xcode!!
Go to File --> New --> Project
Now we can see a Window for selecting our application templet
So make sure you select Application in iOS option on your Left hand side.
then select Single View Application as shown in below picture and Go for Next..

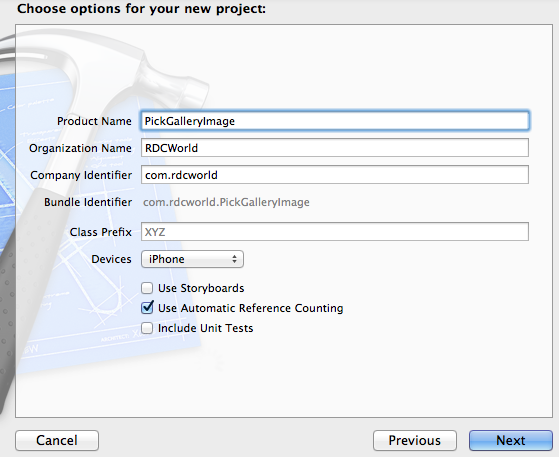
In this Next Window we need to put Our Project Details this way
Product Name : CoreLocationDemo
Organization Name :RDCWorld
Company Identifier : com.rdcworld
Class Prefix : (leave it blank for now)
Devices : iPhone
Note : Don't forget to Make Tick mark on "Use Automatic Reference Counting" option.

Go to Next --> Create.
Now you can see Xcode dashboard .
For using GPS stuff we need to use "CoreLocation.framework" in our application
so let's do it first.
1. Select Project (or click on Blue icon in Top Left side)
2. Go to --> Build Phases --> Link Binary With Libraries > Click on Arrow to expend it --> click on (+) to add
3. in Popup window look for "CoreLocation" this way

Select framework and click Add button.
Now you can see Framework added in our project (a Yellow Suitcase icon ).
so just drag it to below in Frameworks Group (Folder)
Here is our project structure look like

PHASE - II (Design UI)
We need to add UILabel and button on our screen.
UILabel : for showing GPS information.
UIButton : for requesting GPS information with the help of CLLocationManager.
So, Just open ViewController.xib file you can see default blank layout
Now drag one UILabel, double click on it update default name to "Press Button to get Location"
you may like to increase its size as shown in picture.
then same way drag UIButton to Our Layout from Object Lib ( Object Lib you can see in Bottom Right corner)
Give button name as "Get Current Location"
See our layout looking like

PHASE - III (Create IBOutlets and IBAction )
We are going to create IBOutlet for UILabel and IBAction method for UIButton.
Okay, Now select Assistant Editor on Top Right side

You can see our ViewController.xib (Left side) + ViewController.h (Right side) opened together.
1. Fist is First, Create IBOutlet for UILabel
So now just Select UILabel --> Right Click on it
Click on "New Referencing outlet" option and drag cursor to ViewController.h(right side) file, when your cursor is between @interface and @end you can see like this.

Now you will get Popup Window
just put Name : "locationMessageLabel" and click on Connect.

2. Create IBAction for UIButton.
Right click on UIButton on Layout
Select "Touch Up Inside" in Send Event option and drag to header file this way

Now you will get Popup Window
just put the Name : getCurrentLocation
and click on Connect button.

Done!! now agin back to Standard Editor

PHASE - III (Writing Code)
Now Save app, and open ViewController.h file
1. Import CoreLocation Lib header file
#import <CoreLocation/CoreLocation.h>
2. Add delegate to @interface
<CLLocationManagerDelegate>
3. declare CLLocationManager and CLLocation instances
@property (nonatomic, retain) CLLocationManager *locationManager;
@property (nonatomic, retain) CLLocation *latestLocation;
So Finally our ViewController.h file look like
-----------------------------------------------------------------------------------------------------------------------------------------
//
// ViewController.h
// CoreLocationDemo
//
// Created by RDC on 2/28/13.
// Copyright (c) 2013 RDCWorld. All rights reserved.
//
#import <UIKit/UIKit.h>
#import <CoreLocation/CoreLocation.h>
@interface ViewController : UIViewController<CLLocationManagerDelegate>
@property (weak, nonatomic) IBOutlet UILabel *locationMessageLabel;
@property (nonatomic, retain) CLLocationManager *locationManager;
@property (nonatomic, retain) CLLocation *latestLocation;
- (IBAction)getCurrentLocation:(id)sender;
@end
-----------------------------------------------------------------------------------------------------------------------------------------
Now come to ViewController.m file , open it
1. add synthesize (for all declared variable in header file with @property) just below to @implementation
@synthesize locationMessageLabel;
@synthesize locationManager;
@synthesize latestLocation;
2. initialize location manager and start request for location updates in viewDidLoad method
locationManager = [[CLLocationManager alloc] init];
locationManager.delegate = self;
//request for location updates
[locationManager startUpdatingLocation];
3. implement CLLocationManager Delegate's methods
-(void) locationManager:(CLLocationManager *)manager didUpdateLocations:(NSArray *)locations{
//we got the latest location info here
latestLocation = [locations lastObject];
}
-(void) locationManager:(CLLocationManager *)manager didFailWithError:(NSError *)error{
self.locationMessageLabel.text = error.description;
}
4. update getCurrentLocation method code this way
- (IBAction)getCurrentLocation:(id)sender {
double lat = latestLocation.coordinate.latitude;
double lon = latestLocation.coordinate.longitude;
NSString *gpsInfoMessage = [NSString stringWithFormat:@"GPS Details \n\n Latitude : %f \n Longitude : %f",lat,lon];
locationMessageLabel.text = gpsInfoMessage;
locationMessageLabel.numberOfLines = 0;
}
So Finally our ViewController.m file look like
-----------------------------------------------------------------------------------------------------------------------------------------
//
// ViewController.m
// CoreLocationDemo
//
// Created by RDC on 2/28/13.
// Copyright (c) 2013 RDCWorld. All rights reserved.
//
#import "ViewController.h"
@interface ViewController ()
@end
@implementation ViewController
@synthesize locationMessageLabel;
@synthesize locationManager;
@synthesize latestLocation;
#pragma mark - View Controller's Life Cycle methods
- (void)viewDidLoad
{
[super viewDidLoad];
locationManager = [[CLLocationManager alloc] init];
locationManager.delegate = self;
//request for location updates
[locationManager startUpdatingLocation];
}
- (void)didReceiveMemoryWarning
{
[super didReceiveMemoryWarning];
}
#pragma mark - Button click method
- (IBAction)getCurrentLocation:(id)sender {
double lat = latestLocation.coordinate.latitude;
double lon = latestLocation.coordinate.longitude;
NSString *gpsInfoMessage = [NSString stringWithFormat:@"GPS Details \n\n Latitude : %f \n Longitude : %f",lat,lon];
locationMessageLabel.text = gpsInfoMessage;
locationMessageLabel.numberOfLines = 0;
}
#pragma mark - CLLocationManager Delegate's methods
-(void) locationManager:(CLLocationManager *)manager didUpdateLocations:(NSArray *)locations{
//we got the latest location info here
latestLocation = [locations lastObject];
}
-(void) locationManager:(CLLocationManager *)manager didFailWithError:(NSError *)error{
self.locationMessageLabel.text = error.description;
}
@end
-----------------------------------------------------------------------------------------------------------------------------------------
Make sure your AppDelegate file code should be default
Finally our AppDelegate.h file look like
-----------------------------------------------------------------------------------------------------------------------------------------
//
// AppDelegate.h
// CoreLocationDemo
//
// Created by RDC on 2/28/13.
// Copyright (c) 2013 RDCWorld. All rights reserved.
//
#import <UIKit/UIKit.h>
@class ViewController;
@interface AppDelegate : UIResponder <UIApplicationDelegate>
@property (strong, nonatomic) UIWindow *window;
@property (strong, nonatomic) ViewController *viewController;
@end
-----------------------------------------------------------------------------------------------------------------------------------------
Finally our AppDelegate.m file look like
-----------------------------------------------------------------------------------------------------------------------------------------
//
// AppDelegate.m
// CoreLocationDemo
//
// Created by RDC on 2/28/13.
// Copyright (c) 2013 RDCWorld. All rights reserved.
//
#import "AppDelegate.h"
#import "ViewController.h"
@implementation AppDelegate
#pragma mark - Application life cycle methods
- (BOOL)application:(UIApplication *)application didFinishLaunchingWithOptions:(NSDictionary *)launchOptions
{
self.window = [[UIWindow alloc] initWithFrame:[[UIScreen mainScreen] bounds]];
self.viewController = [[ViewController alloc] initWithNibName:@"ViewController" bundle:nil];
self.window.rootViewController = self.viewController;
[self.window makeKeyAndVisible];
return YES;
}
//leave all rest methods for now
@end
-----------------------------------------------------------------------------------------------------------------------------------------
Okay wrap it up this application. let's Run it.
Note : Make sure you have to Run application using Apple's Real Device (iPhone, iPod, and iPad etc.), you can't get best results in simulator.
Here is the output

You need to Allow it "Use Current Location"

Cheers!! we did it. It was so simple because Apple doing everything for us.
we just made it alive.
You can find complete project source code zip file here : CoreLocationDemo
I Would love to here your thought !!